For hard-working and busy PCB design engineers, just like you, an easy-to-use design tool is quite essential for your design task. Among all kinds of PCB design software, EAGLE can be regarded as one of the most prevalent PCB design tools owing to its neat and simple operation display and relatively low cost, being applied by both electronic hobbyists and professional engineers. In this article, I'd like to share three tools for PCB design with EAGLE software to permit you to completely your task quickly and effectively.
Tool 1: Shortcut Keys are the First Accelerator for Your Design.
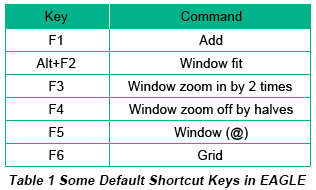
As long as keyboards exist, shortcut keys will be playing a significant role in people's application of computers. Even Ipads that once didn't rely on keyboards today are assembled with keyboards in their new versions. In EAGLE, the application of shortcut keys really allows you to save more time. Besides some default shortcut keys in EAGLE such as what is displayed in Table 1, EAGLE allows its users to assign and set shortcut keys according to personal requirements.

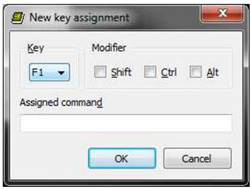
After setting up a schematic, click Options, choose Assign and set shortcuts, as is shown in Figure 1 below. Here, you can assign commands or labels that are always applied for particular keys, such as Delete, Net, Invoke, Copy etc.

For me, I'd like to assign commands for keys which are distributed on the left section of keyboard since I like to keep my left hand on the keyboard and the right one on the mouse in the process of design.
Tool 2: Make the Best of Command Line.
Command line is a blank box under the function bar. It can be regarded as a fast pass card to the functions you'd like to implement.

a. Command searching
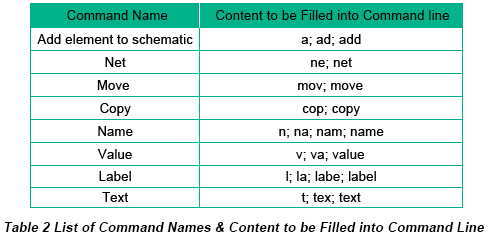
When you fill in the command line with the complete or partial names of commands coupled with Enter key pressed, the corresponding command window will take place immediately. Table 2 is a sketch of names of commands.

b. Texting
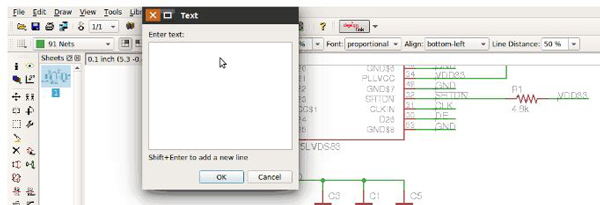
When you add text on circuit board or near some components, command line can be applied as well to accelerate your designing. Enter "text" in the command line, and a window of text will exist where you can press the text content. After pressing OK, you can see the text at the point of your arrow of mouse on the screen.

c. Component displaying
If the project you're engaged in is so complicated that it contains so many components and the same component appears for more than once or twice. As you are going to examine your schematic, command line can be applied through highlighting these commands as you enter the name of component. For example, if you enter R1 into command line, all the R1s in the schematic will become light, which is convenient for your testing of this circuit.
d. Wire width
The width of wire can be modified as you enter a number into command line when you are holding this wire with your mouse.
As a matter of fact, command line can carry out most of your commands in the process of design. It can even translate some script languages.
Tool 3: Help Manual always Helps.
Although this article isn't a complete Eagle PCB Design tutorial, it is capable of driving you to some practical design tools for EAGLE. As a matter of fact, Help Manual is the stably free teacher who instructs you to the success of fast PCB design with EAGLE. However, it seems that we have been aware of the significance of manual, but we'd like to neglect it most. So refer to manual as much as possible. Although manual contains the most complete instructions for engineers, some shortcuts or tricks won't be remembered or made use of unless engineers are fully experienced about them. Practice makes perfect, which is the design rule you have to adhere to.


